学习平台
AcWing SpringBoot框架课
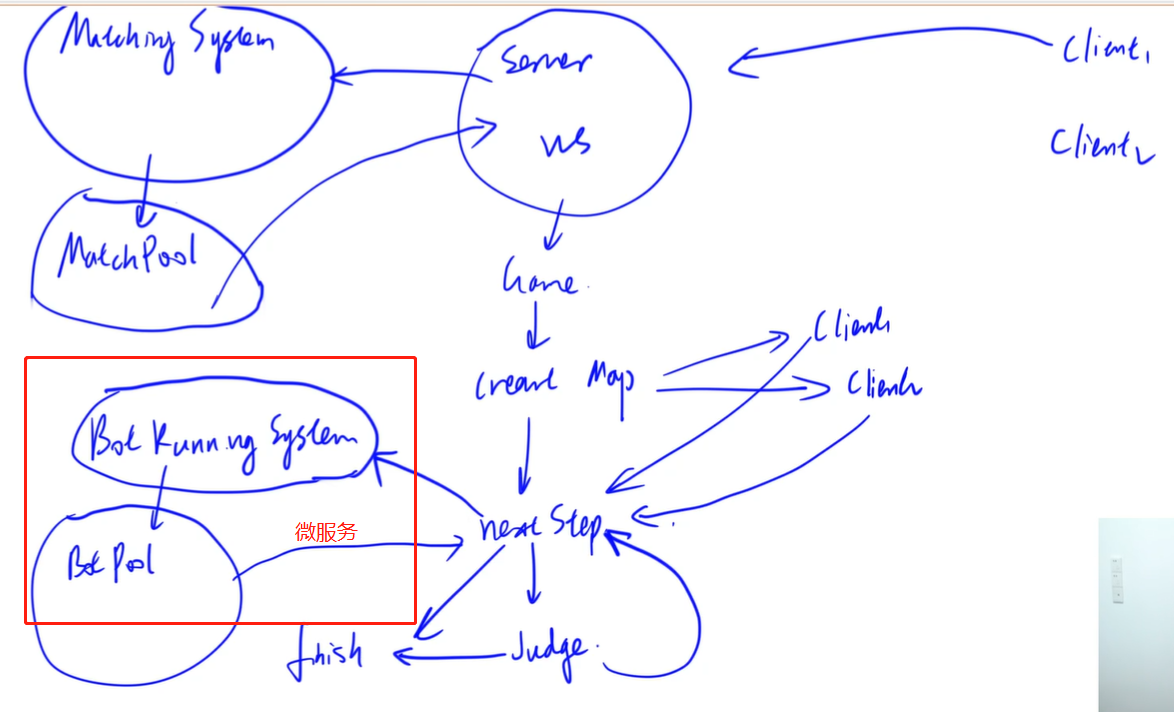
系统流程
项目创建
- 创建
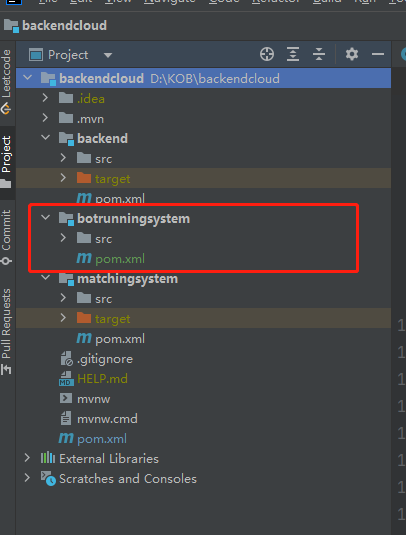
Spring Cloud的子项目botrunningsystem,项目结构图如下
- 在botrunningsystem项目中添加依赖
joor-java-8,用来在java中动态的编译java代码
1
2
3
4
5
6
7
8
9
10
11
12
13
14
15
16
17
18
19
20
21
22
23
24
25
26
27
28
29
30
31
32
33
34
35
36
37
38
39
40
41
42
43
44
45
46
47
48
49
50
51
52
53
54
55
56
57
58
59
60
61
62
63
64
65
| <?xml version="1.0" encoding="UTF-8"?>
<project xmlns="http://maven.apache.org/POM/4.0.0"
xmlns:xsi="http://www.w3.org/2001/XMLSchema-instance"
xsi:schemaLocation="http://maven.apache.org/POM/4.0.0 http://maven.apache.org/xsd/maven-4.0.0.xsd">
<parent>
<artifactId>backendcloud</artifactId>
<groupId>com.kob</groupId>
<version>0.0.1-SNAPSHOT</version>
</parent>
<modelVersion>4.0.0</modelVersion>
<groupId>com.kob.botrunningsystem</groupId>
<artifactId>botrunningsystem</artifactId>
<properties>
<maven.compiler.source>8</maven.compiler.source>
<maven.compiler.target>8</maven.compiler.target>
<project.build.sourceEncoding>UTF-8</project.build.sourceEncoding>
</properties>
<dependencies>
<dependency>
<groupId>org.springframework.boot</groupId>
<artifactId>spring-boot-starter-web</artifactId>
</dependency>
<dependency>
<groupId>org.springframework.boot</groupId>
<artifactId>spring-boot-starter-test</artifactId>
<scope>test</scope>
</dependency>
<dependency>
<groupId>org.springframework.cloud</groupId>
<artifactId>spring-cloud-dependencies</artifactId>
<version>2021.0.3</version>
<type>pom</type>
<scope>import</scope>
</dependency>
<dependency>
<groupId>org.springframework.boot</groupId>
<artifactId>spring-boot-starter-security</artifactId>
<version>2.7.1</version>
</dependency>
<dependency>
<groupId>org.projectlombok</groupId>
<artifactId>lombok</artifactId>
<version>1.18.24</version>
<scope>provided</scope>
</dependency>
<dependency>
<groupId>org.jooq</groupId>
<artifactId>joor-java-8</artifactId>
<version>0.9.14</version>
</dependency>
</dependencies>
</project>
|
- 修改该项目的启动函数,将
Main修改为BotRunningSystemApplication
1
2
3
4
5
6
7
8
9
10
11
12
13
14
15
| package com.kob.botrunningsystem;
import org.springframework.boot.SpringApplication;
import org.springframework.boot.autoconfigure.SpringBootApplication;
@SpringBootApplication
public class BotRunningSystemApplication {
public static void main(String[] args) {
SpringApplication.run(BotRunningSystemApplication.class, args);
}
}
|
- 在
resources中添加配置文件application.properties,端口号为3002
代码实现
BotRunningSystem代码实现
- 需要实现添加Bot的各个接口
botrunningsystem/service/BotRunningService以及botrunningsystem/service/impl/BotRunningServiceImpl,在里面需要实现一个函数addbot,需要该Bot所属的用户的id、Bot代码,已经当前的对局情况发送给函数。
1
2
3
4
5
6
7
8
9
10
| package com.kob.botrunningsystem.service;
public interface BotRunningService {
String addBot(Integer userId, String botCode, String input);
}
|
1
2
3
4
5
6
7
8
9
10
11
12
13
14
15
16
17
18
19
20
21
22
23
24
| package com.kob.botrunningsystem.service.impl;
import com.kob.botrunningsystem.service.BotRunningService;
import org.springframework.stereotype.Service;
@Service
public class BotRunningServiceImpl implements BotRunningService {
@Override
public String addBot(Integer userId, String botCode, String input) {
System.out.println("add bot: " + userId + " " + botCode + " " + input);
return null;
}
}
|
- 实现
botrunningsystem/controller/BotRunningController,实现函数addBot用来调用service层的addBot函数,同时需要接收从backend中传过来的各个数据。
1
2
3
4
5
6
7
8
9
10
11
12
13
14
15
16
17
18
19
20
21
22
23
24
25
26
27
28
29
30
| package com.kob.botrunningsystem.controller;
import com.kob.botrunningsystem.service.BotRunningService;
import org.springframework.beans.factory.annotation.Autowired;
import org.springframework.util.MultiValueMap;
import org.springframework.web.bind.annotation.PostMapping;
import org.springframework.web.bind.annotation.RequestMapping;
import org.springframework.web.bind.annotation.RequestParam;
import org.springframework.web.bind.annotation.RestController;
import java.util.Objects;
@RestController
@RequestMapping("/bot")
public class BotRunningController {
@Autowired
private BotRunningService botRunningService;
@PostMapping("/add")
public String addBot(@RequestParam MultiValueMap<String, String> data) {
Integer userId = Integer.parseInt(Objects.requireNonNull(data.getFirst("user_id")));
String botCode = data.getFirst("bot_code");
String input = data.getFirst("input");
return botRunningService.addBot(userId, botCode, input);
}
}
|
- 可以想到,从
backend向botrunningsystem中发送请求时需要将请求放行,并只能将本地连接方向。因此需要实现botrunningsystem/config/SecurityConfig。需要方行的连接为/bot/add/
1
2
3
4
5
6
7
8
9
10
11
12
13
14
15
16
17
18
19
20
21
22
23
24
25
26
27
28
29
30
31
| package com.kob.botrunningsystem.config;
import org.springframework.context.annotation.Configuration;
import org.springframework.http.HttpMethod;
import org.springframework.security.config.annotation.web.builders.HttpSecurity;
import org.springframework.security.config.annotation.web.configuration.EnableWebSecurity;
import org.springframework.security.config.annotation.web.configuration.WebSecurityConfigurerAdapter;
import org.springframework.security.config.http.SessionCreationPolicy;
@Configuration
@EnableWebSecurity
public class SecurityConfig extends WebSecurityConfigurerAdapter {
@Override
protected void configure(HttpSecurity http) throws Exception {
http.csrf().disable()
.sessionManagement().sessionCreationPolicy(SessionCreationPolicy.STATELESS)
.and()
.authorizeRequests()
.antMatchers("/bot/add/").hasIpAddress("127.0.0.1")
.antMatchers(HttpMethod.OPTIONS).permitAll()
.anyRequest().authenticated();
}
}
|
- 同时,当添加Bot完成后,需要向backend返回信息,所以也需要
RestTemplate来向另一个服务发送请求。因此需要实现botrunningsystem/config/RestTemplateConfig
1
2
3
4
5
6
7
8
9
10
11
12
13
14
15
16
17
18
19
| package com.kob.botrunningsystem.config;
import org.springframework.context.annotation.Bean;
import org.springframework.context.annotation.Configuration;
import org.springframework.web.client.RestTemplate;
@Configuration
public class RestTemplateConfig {
@Bean
public RestTemplate getRestTemplate() {
return new RestTemplate();
}
}
|
前端实现
实现步骤
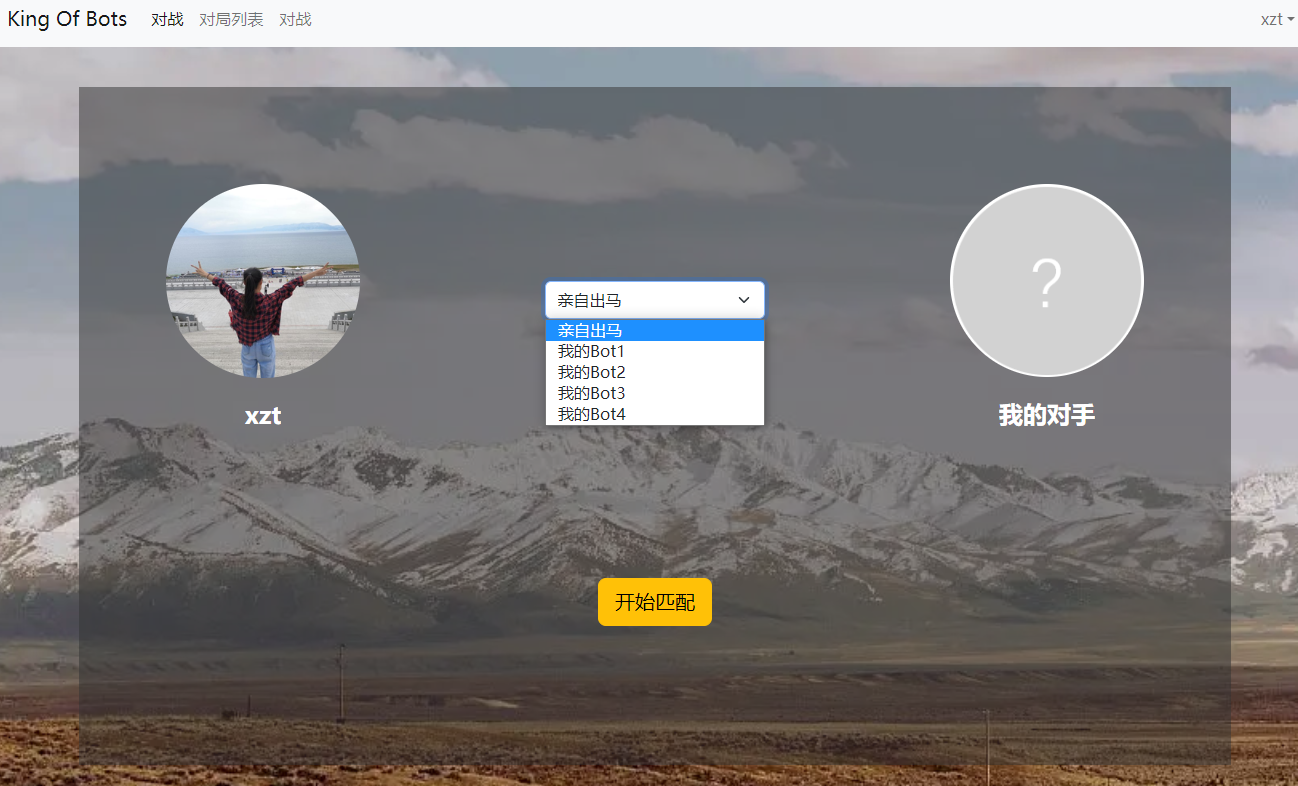
需要在前端的匹配界面加上一个下拉选择框,可以让玩家选择是自己出战还是自己编写的Bot出战。因此需要对components/MatchGround.vue进行改写。
- 首先修改html组件,将原来的两个用户占比从
col-6变为col-4,然后在中间添加一个下拉选择框,也占比col-4
- 在js中实现获取当前用户的所有Bot列表,实现一个函数
refresh_bots,并且将获取到的bot列表保存在bots中。
- 修改下拉选择框组件,将所有的Bot显示在组件中,通过
v-for实现。
- 在
<select>中使用v-model对选择的选项进行双向绑定,绑定在select_bot变量中,初始为-1,代表亲自出战。
- 修改【开始匹配】的触发函数,需要向前端传送一个参数为
bot_id,表示此时出栈的Bot的id,若为-1,则代表自己出战,否则为Bot代码出战。
1
2
3
4
5
6
7
8
9
10
11
12
13
14
15
16
17
18
19
20
21
22
23
24
25
26
27
28
29
30
31
32
33
34
35
36
37
38
39
40
41
42
43
44
45
46
47
48
49
50
51
52
53
54
55
56
57
58
59
60
61
62
63
64
65
66
67
68
69
70
71
72
73
74
75
76
77
78
79
80
81
82
83
84
85
86
87
88
89
90
91
92
93
94
95
96
97
98
99
100
101
102
103
104
105
106
107
108
109
110
111
112
113
114
115
116
117
118
119
120
121
122
123
124
| <template>
<div class="matchground">
<div class="row">
<div class="col-4">
<div class="user-photo">
<img :src="$store.state.user.photo" alt="">
</div>
<div class="user-username">
{{ $store.state.user.username }}
</div>
</div>
<!-- 下拉选择框 -->
<div class="col-4">
<div class="user-select-bot">
<select v-model="select_bot" class="form-select" aria-label="Default select example">
<option value="-1" selected>亲自出马</option>
<option v-for="bot in bots" :key="bot.id" :value="bot.id">
{{ bot.title }}
</option>
</select>
</div>
</div>
<div class="col-4">
<div class="user-photo">
<img :src="$store.state.pk.opponent_photo" alt="">
</div>
<div class="user-username">
{{ $store.state.pk.opponent_username }}
</div>
</div>
<div class="col-12" style="text-align: center; padding-top: 15vh;">
<button @click="click_match_btn" type="button" class="btn btn-warning btn-lg">{{ match_btn_info }}</button>
</div>
</div>
</div>
</template>
<script>
import { ref } from 'vue'
import { useStore } from 'vuex';
import $ from 'jquery'
export default {
setup() {
const store = useStore();
let match_btn_info = ref("开始匹配");
let bots = ref([]);
let select_bot = ref("-1");
const click_match_btn = () => {
if(match_btn_info.value === "开始匹配") {
match_btn_info.value ="取消匹配";
store.state.pk.socket.send(JSON.stringify({
event: "start-matching",
bot_id: select_bot.value,
}));
} else {
match_btn_info.value = "开始匹配";
store.state.pk.socket.send(JSON.stringify({
event: "stop-matching",
}));
}
}
const refresh_bots = () => {
$.ajax({
url: "http://127.0.0.1:3000/user/bot/getlist/",
type: "get",
headers: {
Authorization: "Bearer " + store.state.user.token,
},
success(resp) {
console.log(resp);
bots.value = resp;
},
error(resp) {
console.log(resp);
},
});
};
refresh_bots(); // 从云端动态获取bots
return {
match_btn_info,
click_match_btn,
bots,
select_bot,
}
}
}
</script>
<style scoped>
div.matchground{
width: 60vw;
height: 70vh;
background-color: rgba(50, 50, 50, 0.5);
margin: 40px auto 0;
}
div.user-photo{
text-align: center;
padding-top: 10vh;
}
div.user-photo > img {
border-radius: 50%;
width: 20vh;
}
div.user-username{
text-align: center;
font-size: 24px;
font-weight: 600;
color: white;
padding-top: 2vh;
}
div.user-select-bot {
padding-top: 20vh;
}
div.user-select-bot > select {
width: 60%;
margin: 0 auto;
}
</style>
|
实现效果
这里的Bot列表是自己的Bot列表,自己创建了几个,就显示几个。
匹配功能改进
backend代码改写
这里主要需要改写的内容是前端传过来了bot_id,需要在backend中进行接收,并且修改所有相对应的函数。
主要流程

实现步骤
- 首先修改
backend/consumer/WebSocketServer中的onMessage函数,这个是用来接收前端传来的数据,当前端传来的事件event为start-matching时,代表了玩家点击了开始匹配,此时需要调用startMatching函数,这里调用该函数时,现在需要传一个参数为前端接收的bot_id
1
2
3
4
5
6
7
8
9
10
11
12
13
14
15
| @OnMessage
public void onMessage(String message, Session session) {
System.out.println("receive message!");
JSONObject data = JSONObject.parseObject(message);
String event = data.getString("event");
if("start-matching".equals(event)) {
startMatching(data.getInteger("bot_id"));
} else if("stop-matching".equals(event)) {
stopMatching();
} else if("move".equals(event)) {
move(data.getInteger("direction"));
}
}
|
- 修改
backend/consumer/WebSocketServer中的startMatching函数,再向matchingsystem服务器中发送请求时需要将botId传过去,因此需要再参数data中需要添加bot_id:data.add("bot_id", botId.toString());
1
2
3
4
5
6
7
8
9
10
11
12
|
private void startMatching(Integer botId) {
System.out.println("start matching");
MultiValueMap<String, String> data = new LinkedMultiValueMap<>();
data.add("user_id", this.user.getId().toString());
data.add("rating", this.user.getRating().toString());
data.add("bot_id", botId.toString());
restTemplate.postForObject(addPlayerUrl, data, String.class);
}
|
matchingsystem代码改写
- 首先修改
matchingsystem/controller/MatchingController中的addPlayer函数,从backend传过来的参数data中获取botId,并在调用service层的addPlayer函数时将botId传过去
1
2
3
4
5
6
7
| @PostMapping("/add")
public String addPlayer(@RequestParam MultiValueMap<String, String> data) {
Integer userId = Integer.parseInt(Objects.requireNonNull(data.getFirst("user_id")));
Integer rating = Integer.parseInt(Objects.requireNonNull(data.getFirst("rating")));
Integer botId = Integer.parseInt(Objects.requireNonNull(data.getFirst("bot_id")));
return matchingService.addPlayer(userId, rating, botId);
}
|
- 修改
matchingsystem/service/MatchingService中的addPlayer函数,以及impl/MatchingServiceImpl中的addPlayer函数实现,形参列表添加一个参数botId,并且在调用matchingpool中的addPlayer函数时将botId传过去。
1
2
3
4
5
6
| @Override
public String addPlayer(Integer userId, Integer rating, Integer botId) {
System.out.println("add Player" + userId + " " + rating);
matchingPool.addPlayer(userId, rating, botId);
return "add player success";
}
|
修改matchingsystem/service/impl/utils/MatchingPool
修改addPlayer函数,添加一个参数botId,
修改Player实体类,添加一个变量botId,然后new Player的时候构造函数传入botId
1
2
3
4
5
6
7
8
9
10
11
12
13
14
15
16
17
18
19
20
|
package com.kob.matchingsystem.service.impl.utils;
import lombok.AllArgsConstructor;
import lombok.Data;
import lombok.NoArgsConstructor;
@Data
@AllArgsConstructor
@NoArgsConstructor
public class Player {
private Integer userId;
private Integer rating;
private Integer botId;
private Integer waitingTime;
}
|
修改sendResult函数,在向backend服务器端返回的时候,需要将两个已经匹配的玩家的botId一起发送过去,因此需要在参数data中添加两个key-value:a_bot_id和b_bot_id。
1
2
3
4
5
6
7
8
9
10
11
12
13
14
15
16
17
18
19
20
21
22
| public void addPlayer(Integer userId, Integer rating, Integer botId) {
lock.lock();
try {
players.add(new Player(userId, rating, botId, 0));
}finally {
lock.unlock();
}
}
private void sendResult(Player a, Player b) {
System.out.println("send result: " + a + " " + b);
MultiValueMap<String, String> data = new LinkedMultiValueMap<>();
data.add("a_id", a.getUserId().toString());
data.add("b_id", b.getUserId().toString());
data.add("a_bot_id", a.getBotId().toString());
data.add("b_bot_id", b.getBotId().toString());
restTemplate.postForObject(startGameUrl, data, String.class);
}
|
backend代码改写
- 首先就是接收
matchingsystem传递的参数需要添加a_bot_id和b_bot_id的接收。修改backend/controller/pk/StartGameController中的startGame函数。接收传过来的aBotId和bBotId,并在调用service层的时候传递参数。
1
2
3
4
5
6
7
8
| @PostMapping("/game/start/")
public String startGame(@RequestParam MultiValueMap<String, String> data) {
int aId = Integer.parseInt(Objects.requireNonNull(data.getFirst("a_id")));
int aBotId = Integer.parseInt(Objects.requireNonNull(data.getFirst("a_bot_id")));
int bId = Integer.parseInt(Objects.requireNonNull(data.getFirst("b_id")));
int bBotId = Integer.parseInt(Objects.requireNonNull(data.getFirst("b_bot_id")));
return startGameService.startGame(aId, aBotId, bId, bBotId);
}
|
- 修改
backend/service/pk/StartService和backend/Service/impl/pk/StartServiceImpl中,添加参数,并且在实现类中调用WebSocketServer中的startGame时传递参数。
1
2
3
4
5
6
| @Override
public String startGame(Integer aId, Integer aBotId, Integer bId, Integer bBotId) {
System.out.println("start game: " + aId + " " + bId + " " + aBotId + " " + bBotId);
WebSocketServer.startGame(aId, aBotId, bId, bBotId);
return "start game success";
}
|
- 修改
backend/consumer/WebSocketServer中的startGame函数,接收两个参数,并且根据两个botId,获得对应的Bot,因此这里需要引入BotMapper,并在Game的构造函数中进行传入两个参数botA和botB。
1
2
3
4
5
6
7
8
9
10
11
12
13
14
15
16
17
18
19
20
21
22
23
24
25
26
27
28
29
30
31
32
33
34
35
36
37
38
39
40
41
42
43
44
45
46
47
48
49
50
51
52
53
54
55
56
57
58
59
60
61
62
63
64
65
66
67
68
| private static BotMapper botMapper;
@Autowired
public void setBotMapper(BotMapper botMapper) {
WebSocketServer.botMapper = botMapper;
}
public static void startGame(Integer aId, Integer aBotId, Integer bId, Integer bBotId) {
User a = userMapper.selectById(aId);
User b = userMapper.selectById(bId);
System.out.println(aBotId + " " + bBotId);
Bot botA = botMapper.selectById(aBotId);
Bot botB = botMapper.selectById(bBotId);
Game game = new Game(
13,
14,
20,
a.getId(),
botA,
b.getId(),
botB);
game.createMap();
game.start();
if (users.get(a.getId()) != null)
users.get(a.getId()).game = game;
if (users.get(b.getId()) != null)
users.get(b.getId()).game = game;
JSONObject respGame = new JSONObject();
respGame.put("a_id", game.getPlayerA().getId());
respGame.put("a_sx", game.getPlayerA().getSx());
respGame.put("a_sy", game.getPlayerA().getSy());
respGame.put("b_id", game.getPlayerB().getId());
respGame.put("b_sx", game.getPlayerB().getSx());
respGame.put("b_sy", game.getPlayerB().getSy());
respGame.put("map", game.getG());
JSONObject respA = new JSONObject();
respA.put("event", "success-matching");
respA.put("opponent_username", b.getUsername());
respA.put("opponent_photo", b.getPhoto());
respA.put("game", respGame);
if(users.get(a.getId()) != null) {
WebSocketServer webSocketServerA = users.get(a.getId());
webSocketServerA.sendMessage(respA.toJSONString());
}
JSONObject respB = new JSONObject();
respB.put("event", "success-matching");
respB.put("opponent_username", a.getUsername());
respB.put("opponent_photo", a.getPhoto());
respB.put("game", respGame);
if(users.get(b.getId()) != null)
users.get(b.getId()).sendMessage(respB.toJSONString());
}
|
- 修改
backend/consumer/utils/Game中的构造函数,添加两个参数。然后在new Player时通过构造函数传入两个参数,这里传之前需要进行判断。如果botA为null,则botIdA = -1,botCodeA = ""。同理得到botIdB和botCodeB。
1
2
3
4
5
6
7
8
9
10
11
12
13
14
15
16
17
18
19
20
| public Game(Integer rows, Integer cols, Integer inner_walls_count, Integer idA, Bot botA, Integer idB, Bot botB) {
this.rows = rows;
this.cols = cols;
this.inner_walls_count = inner_walls_count;
this.g = new int[rows][cols];
Integer botIdA = -1, botIdB = -1;
String botCodeA = "", botCodeB = "";
if(botA != null) {
botIdA = botA.getId();
botCodeA = botA.getContent();
}
if(botB != null) {
botIdB = botB.getId();
botCodeB = botB.getContent();
}
playerA = new Player(idA, botIdA, botCodeA, this.rows - 2, 1, new ArrayList<>());
playerB = new Player(idB, botIdB, botCodeB, 1, this.cols - 2, new ArrayList<>());
}
|
- 这里需要修改
backend/consumer/utils/Player实体类,添加两个成员变量botId和botCode。
1
2
3
4
5
6
7
8
9
10
11
12
13
14
15
16
17
18
19
20
21
22
23
24
25
26
27
28
29
30
31
32
33
34
35
36
37
38
39
40
41
42
43
44
45
46
47
48
49
50
51
52
53
54
55
56
57
58
59
60
61
62
63
64
65
66
67
68
69
70
71
| package com.kob.backend.consumer.utils;
import lombok.AllArgsConstructor;
import lombok.Data;
import lombok.NoArgsConstructor;
import java.util.ArrayList;
import java.util.List;
@Data
@NoArgsConstructor
@AllArgsConstructor
public class Player {
private Integer id;
private Integer botId;
private String botCode;
private Integer sx;
private Integer sy;
private List<Integer> steps;
private boolean check_tail_increasing(int step) {
if(step <= 10) return true;
return step % 3 == 1;
}
public List<Cell> getCells() {
List<Cell> res = new ArrayList<>();
int[] dx = {-1, 0, 1, 0}, dy = {0, 1, 0, -1};
int x = sx, y = sy;
int step = 0;
res.add(new Cell(x, y));
for (int d : steps) {
x += dx[d];
y += dy[d];
res.add(new Cell(x, y));
if (!check_tail_increasing(++ step)) {
res.remove(0);
}
}
return res;
}
public String getStepsString() {
StringBuilder res = new StringBuilder();
for(int d: steps) {
res.append(d);
}
return res.toString();
}
}
|
- 最后需要修改
backend/consumer/WebSocketServer中的move函数,只有当BotId是-1时,也就是亲自出战的时候,才需要接收键盘的操作。为了当执行Bot时人为输入造成影响。
1
2
3
4
5
6
7
8
9
10
11
12
13
14
|
private void move(int direction) {
if(game.getPlayerA().getId().equals(user.getId())) {
if(game.getPlayerA().getBotId().equals(-1))
game.setNextStepA(direction);
} else if(game.getPlayerB().getId().equals(user.getId())) {
if(game.getPlayerB().getBotId().equals(-1))
game.setNextStepB(direction);
}
}
|
至此,两个玩家(无论是亲自出战还是Bot出战)都可以顺利匹配上了。
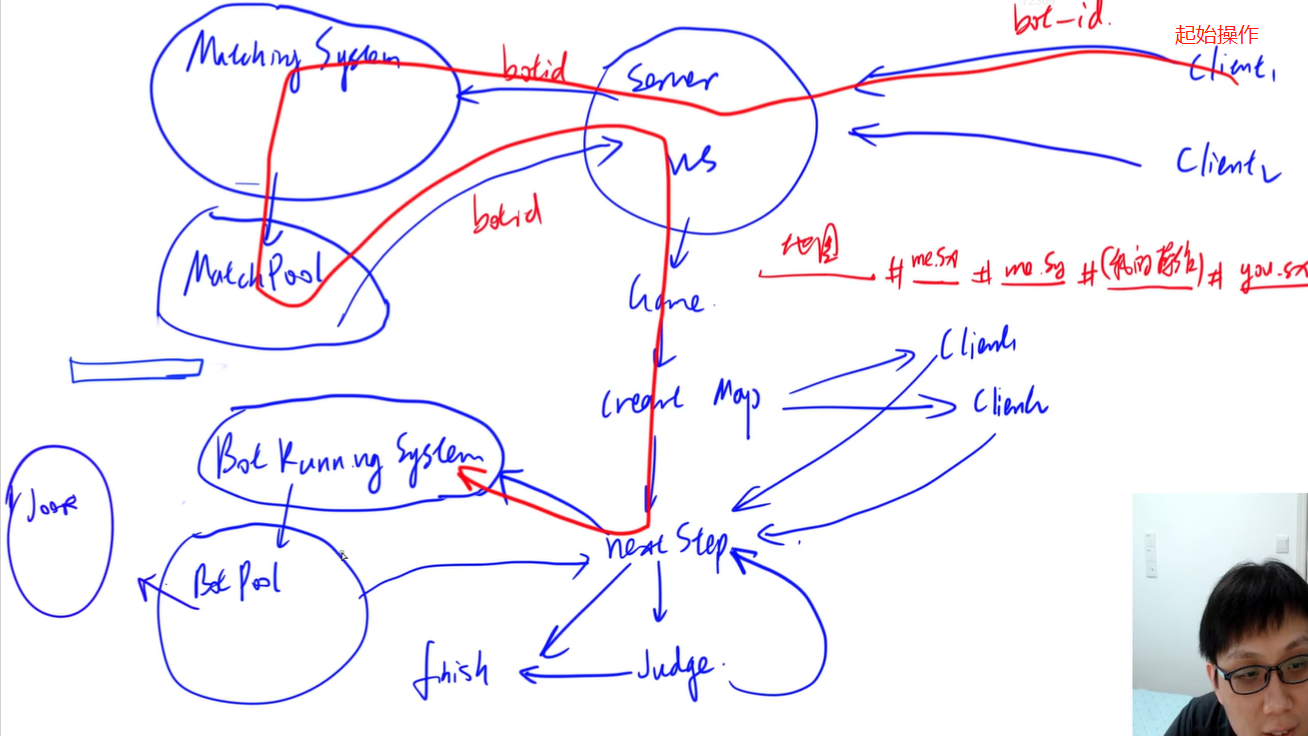
Bot代码执行实现
整体流程
backend代码实现
- 首先需要在等待两名玩家下一步操作之前(也就是
backend/consumer/utils/Game中的nextStep函数),判断两个用户中是否有使用Bot代码执行的。这里通过实现sendBotCode函数来实现。
sendBotCode函数:判断用户是否亲自上阵(botId为-1时亲自上阵),如果不是亲自上阵,则需要向botrunningsystem微服务发送请求添加Bot。这一部分在上面已经实现过了( BotRunningSystem代码实现 ),因此需要传递三个参数:
- user_id:直接通过
player.getId().toString()获取
- bot_code:直接通过
player.getBotCode()获取。
- input:这里需要传入整个对局当前的状态,包括地图、两个玩家的起始位置、两个玩家所走的步骤等。因此我们额外实现一个函数getInput,来获取当前游戏的状态。
- 另外需要使用
WebSockectServer中的RestTemplate来向botrunningsystem发送请求。因此需要将WebSockectServer中的RestTemplate改为public。并且定义addBotUrl
- 实现
getInput函数:这里我们将对局信息的格式定义为:"地图#自己的起始横坐标#自己的起始纵坐标#(我的操作)#对手的起始横坐标#对手的起始纵坐标#(对手的操作)"
- 首先需要通过id来判断当前用户是属于playerA还是playerB。
1
2
3
4
5
6
7
8
9
10
11
12
13
14
15
16
17
18
19
20
21
22
23
24
25
26
27
28
29
30
31
32
33
34
35
36
37
38
39
40
41
42
43
44
45
46
47
48
49
50
51
52
53
54
55
56
57
58
59
60
61
62
63
64
65
66
67
| private final static String addBotUrl = "http://127.0.0.1:3002/bot/add/";
private String getInput(Player player) {
Player me, you;
if(playerA.getId().equals(player.getId())) {
me = playerA;
you = playerB;
} else {
me = playerB;
you = playerA;
}
return getMapString() + "#" + me.getSx() + "#" + me.getSy() + "#(" + me.getStepsString() + ")#" +
you.getSx() + "#" + you.getSy() + "#(" + you.getStepsString() + ")";
}
private void sendBotCode(Player player) {
if(player.getBotId().equals(-1)) return ;
MultiValueMap<String, String> data = new LinkedMultiValueMap<>();
data.add("user_id", player.getId().toString());
data.add("bot_code", player.getBotCode());
data.add("input", getInput(player));
WebSocketServer.restTemplate.postForObject(addBotUrl, data, String.class);
}
private boolean nextStep() {
try {
Thread.sleep(200);
} catch (InterruptedException e) {
e.printStackTrace();
}
sendBotCode(playerA);
sendBotCode(playerB);
for (int i = 0; i < 50; i++) {
try {
Thread.sleep(100);
lock.lock();
try {
if(nextStepA != null && nextStepB != null) {
playerA.getSteps().add(nextStepA);
playerB.getSteps().add(nextStepB);
return true;
}
} finally {
lock.unlock();
}
} catch (InterruptedException e) {
e.printStackTrace();
}
}
return false;
}
|
实现效果验证
当其中一个用户使用Bot进行匹配时,匹配成功后,3002服务端会输出所有传递过来的信息。
1
2
3
4
5
| @Override
public String addBot(Integer userId, String botCode, String input) {
System.out.println("add bot: " + userId + " " + botCode + " " + input);
return null;
}
|
输出信息:

1
| add bot: 1 System.out.println("Bot1"); 11111111111111100010000000011000100000011110000100000001100110000000011000111000000110000000000001100000011100011000000001100110000000100001111000000100011000000001000111111111111111
|
botrunningsystem代码实现
首先一些接口的实现已经在上 BotRunningSystem代码实现 实现了,但是botrunningsystem/service/impl/BotRunningServiceImpl的逻辑代码还没有具体实现。下面就实现这一部分。
首先这一部分的逻辑类似于【生产者消费者模型】,当从bacend(生产者)传过来一个Bot时,botrunningsystem(消费者)才会对这个Bot进行编译执行。否则就会一直等待。
BotPool代码实现
1
2
3
4
5
6
7
8
9
10
11
12
13
14
15
16
17
18
19
20
21
22
23
24
25
26
27
28
29
30
31
32
33
34
35
36
37
38
39
40
41
42
43
44
45
46
47
48
49
50
51
52
53
54
55
56
57
58
59
60
61
62
| package com.kob.botrunningsystem.service.impl.utils;
import java.util.LinkedList;
import java.util.Queue;
import java.util.concurrent.locks.Condition;
import java.util.concurrent.locks.ReentrantLock;
public class BotPool extends Thread {
private final ReentrantLock lock = new ReentrantLock();
private final Condition condition = lock.newCondition();
private Queue<Bot> bots = new LinkedList<>();
public void addBot(Integer userId, String botCode, String input) {
lock.lock();
try {
bots.add(new Bot(userId, botCode, input));
condition.signalAll();
} finally {
lock.unlock();
}
}
private void consume(Bot bot) {
Consumer consumer = new Consumer();
consumer.startTimeout(2000, bot);
}
@Override
public void run() {
while (true) {
lock.lock();
if(bots.isEmpty()) {
try {
condition.await();
} catch (InterruptedException e) {
e.printStackTrace();
lock.unlock();
break;
}
} else {
Bot bot = bots.remove();
lock.unlock();
consume(bot);
}
}
}
}
|
Consumer代码实现
这个部分就是用来模拟消费者消费的过程,也就是用来将需要编译执行的Bot代码进行执行的部分。
- 首先编译时间不能过长,我们可以通过
join(timeout)来进行timeout后终止线程来实现,因此consumer类也需要继承自Thread并重写run函数。
startTimeout(timeout)函数:这里通过this.start来开启当前的编译代码的线程,用this.join(timeout)来控制线程,如果线程在timeout后还没有结束,则直接中断线程。run函数:使用joor-java-8依赖中的函数Reflect.compile来编译穿过俩的Bot代码。这个函数如果时相同的代码则只会编译一次,因此需要使用UUID来对穿过来的代码类名做修改。
- 编译结果会返回到一个自己定义的接口
BotInterface中,然后通过调用这个接口中定义的nextMove函数获取Bot输出的下一步方向。
- 最后通过
RestTemplate向backend返回用户id以及下一步的移动方向direction。
- 发送连接为:
http://127.0.0.1:3000/pk/receive/bot/move/
1
2
3
4
5
6
7
8
9
10
11
12
13
14
15
16
17
18
19
20
21
22
23
24
25
26
27
28
29
30
31
32
33
34
35
36
37
38
39
40
41
42
43
44
45
46
47
48
49
50
51
52
53
54
55
56
57
58
59
60
61
62
63
64
65
66
67
68
69
70
71
72
73
74
| package com.kob.botrunningsystem.service.impl.utils;
import com.kob.botrunningsystem.utils.BotInterface;
import org.joor.Reflect;
import org.springframework.beans.factory.annotation.Autowired;
import org.springframework.stereotype.Component;
import org.springframework.util.LinkedMultiValueMap;
import org.springframework.util.MultiValueMap;
import org.springframework.web.client.RestTemplate;
import java.util.UUID;
@Component
public class Consumer extends Thread {
private Bot bot;
private static RestTemplate restTemplate;
private final static String receiveBotMoveUrl = "http://127.0.0.1:3000/pk/receive/bot/move/";
@Autowired
public void setRestTemplate(RestTemplate restTemplate) {
Consumer.restTemplate = restTemplate;
}
public void startTimeout(long timeout, Bot bot) {
this.bot = bot;
this.start();
try {
this.join(timeout);
} catch (InterruptedException e) {
e.printStackTrace();
} finally {
this.interrupt();
}
}
private String addUid(String code, String uid) {
int k = code.indexOf(" implements com.kob.botrunningsystem.utils.BotInterface");
return code.substring(0, k) + uid + code.substring(k);
}
@Override
public void run() {
UUID uuid = UUID.randomUUID();
String uid = uuid.toString().substring(0, 8);
BotInterface botInterface = Reflect.compile(
"com.kob.botrunningsystem.utils.Bot" + uid,
addUid(bot.getBotCode(), uid)
).create().get();
Integer direction = botInterface.nextMove(bot.getInput());
System.out.println("move-direction: " + bot.getUserId() + " " + direction);
MultiValueMap<String, String> data = new LinkedMultiValueMap<>();
data.add("user_id", bot.getUserId().toString());
data.add("direction", direction.toString());
restTemplate.postForObject(receiveBotMoveUrl, data, String.class);
}
}
|
BotInterface接口
定义一个接口,用户所有写的Bot代码需要实现该接口
1
2
3
4
5
6
7
8
9
10
11
12
13
14
| package com.kob.botrunningsystem.utils;
public interface BotInterface {
Integer nextMove(String input);
}
|
下面提供一个Bot代码:
1
2
3
4
5
6
7
8
9
10
11
12
13
14
15
16
17
18
19
20
21
22
23
24
25
26
27
28
29
30
31
32
33
34
35
36
37
38
39
40
41
42
43
44
45
46
47
48
49
50
51
52
53
54
55
56
57
58
59
60
61
62
63
64
65
66
67
68
69
70
71
72
73
74
75
76
77
78
79
80
81
82
| package com.kob.botrunningsystem.utils;
import java.util.ArrayList;
import java.util.List;
public class Bot implements com.kob.botrunningsystem.utils.BotInterface {
static class Cell {
public int x, y;
public Cell(int x, int y) {
this.x = x;
this.y = y;
}
}
private boolean check_tail_increasing(int step) {
if(step <= 10) return true;
return step % 3 == 1;
}
public List<Cell> getCells(int sx, int sy, String steps) {
steps = steps.substring(1, steps.length() - 1);
List<Cell> res = new ArrayList<>();
int[] dx = {-1, 0, 1, 0}, dy = {0, 1, 0, -1};
int x = sx, y = sy;
int step = 0;
res.add(new Cell(x, y));
for (int i = 0; i < steps.length(); i ++ ) {
int d = steps.charAt(i) - '0';
x += dx[d];
y += dy[d];
res.add(new Cell(x, y));
if (!check_tail_increasing(++ step)) {
res.remove(0);
}
}
return res;
}
@Override
public Integer nextMove(String input) {
String[] strs = input.split("#");
int[][] g = new int[13][14];
for(int i = 0, k = 0; i < 13; i ++) {
for (int j = 0; j < 14; j ++, k ++) {
if(strs[0].charAt(k) == '1')
g[i][j] = 1;
}
}
int aSx = Integer.parseInt(strs[1]), aSy = Integer.parseInt(strs[2]);
int bSx = Integer.parseInt(strs[4]), bSy = Integer.parseInt(strs[5]);
List<Cell> aCells = getCells(aSx, aSy, strs[3]);
List<Cell> bCells = getCells(bSx, bSy, strs[6]);
for(Cell c : aCells) g[c.x][c.y] = 1;
for(Cell c : bCells) g[c.x][c.y] = 1;
int[] dx = {-1, 0, 1, 0}, dy = {0, 1, 0, -1};
for (int i = 0; i < 4; i++) {
int x = aCells.get(aCells.size() - 1).x + dx[i];
int y = aCells.get(aCells.size() - 1).y + dy[i];
if(x >= 0 && x < 13 && y >= 0 && y < 14 && g[x][y] == 0) {
return i;
}
}
return 0;
}
}
|
backend接收代码
- 实现接收的
controller—-backend/controller/pk/ReceiveBotMoveController。接收路径为/pk/receive/bot/move/。用来接收botrunningsystem发送的userId和direction。然后调用service层的函数并传递参数。
1
2
3
4
5
6
7
8
9
10
11
12
13
14
15
16
17
18
19
20
21
22
23
24
25
26
27
28
29
30
| package com.kob.backend.controller.pk;
import com.kob.backend.service.pk.ReceiveBotMoveService;
import org.springframework.beans.factory.annotation.Autowired;
import org.springframework.util.MultiValueMap;
import org.springframework.web.bind.annotation.PostMapping;
import org.springframework.web.bind.annotation.RequestMapping;
import org.springframework.web.bind.annotation.RequestParam;
import org.springframework.web.bind.annotation.RestController;
import java.util.Objects;
@RestController
@RequestMapping("/pk")
public class ReceiveBotMoveController {
@Autowired
private ReceiveBotMoveService receiveBotMoveService;
@PostMapping("/receive/bot/move")
public String receiveBotMove(@RequestParam MultiValueMap<String, String> data) {
int userId = Integer.parseInt(Objects.requireNonNull(data.getFirst("user_id")));
int direction = Integer.parseInt(Objects.requireNonNull(data.getFirst("direction")));
return receiveBotMoveService.receiveBotMove(userId, direction);
}
}
|
- 将该链接在
backend/config/SecurityConfig中放行。
1
2
3
4
5
6
7
8
9
10
11
12
13
| @Override
protected void configure(HttpSecurity http) throws Exception {
http.csrf().disable()
.sessionManagement().sessionCreationPolicy(SessionCreationPolicy.STATELESS)
.and()
.authorizeRequests()
.antMatchers("/user/account/token/", "/user/account/register/").permitAll()
.antMatchers("/pk/game/start/", "/pk/receive/bot/move/").hasIpAddress("127.0.0.1")
.antMatchers(HttpMethod.OPTIONS).permitAll()
.anyRequest().authenticated();
http.addFilterBefore(jwtAuthenticationTokenFilter, UsernamePasswordAuthenticationFilter.class);
}
|
- 实现对应的service层代码:
backend/service/pk/ReceiveBotMoveService
1
2
3
4
5
6
7
8
9
| package com.kob.backend.service.pk;
public interface ReceiveBotMoveService {
String receiveBotMove(Integer userId, Integer direction);
}
|
backend/service/impl/pk/ReceiveBotMoveServiceImpl,在这一部分需要通过WebSocketServer首先获取userId对应的game,然后通过调用backend/consumer/utils/Game中的setNextStepA和setNextStepB来分别设置direction。
1
2
3
4
5
6
7
8
9
10
11
12
13
14
15
16
17
18
19
20
21
22
23
24
25
26
27
28
29
30
31
| package com.kob.backend.service.impl.pk;
import com.kob.backend.consumer.WebSocketServer;
import com.kob.backend.consumer.utils.Game;
import com.kob.backend.service.pk.ReceiveBotMoveService;
import org.springframework.stereotype.Service;
@Service
public class ReceiveBotMoveServiceImpl implements ReceiveBotMoveService {
@Override
public String receiveBotMove(Integer userId, Integer direction) {
System.out.println("receive bot move: " + userId + " " + direction);
if(WebSocketServer.users.get(userId) != null) {
Game game = WebSocketServer.users.get(userId).game;
if(game != null) {
if (game.getPlayerA().getId().equals(userId)) {
game.setNextStepA(direction);
} else if (game.getPlayerB().getId().equals(userId)) {
game.setNextStepB(direction);
}
}
}
return "receive Bot move success";
}
}
|
实现效果
两个玩家都是用上面给的Bot代码进行匹配,玩家本人不进行任何操作。效果如下:

可以顺利匹配成功。

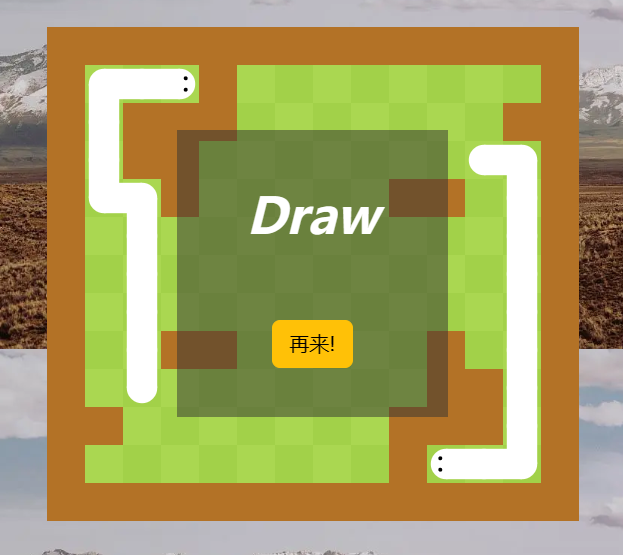
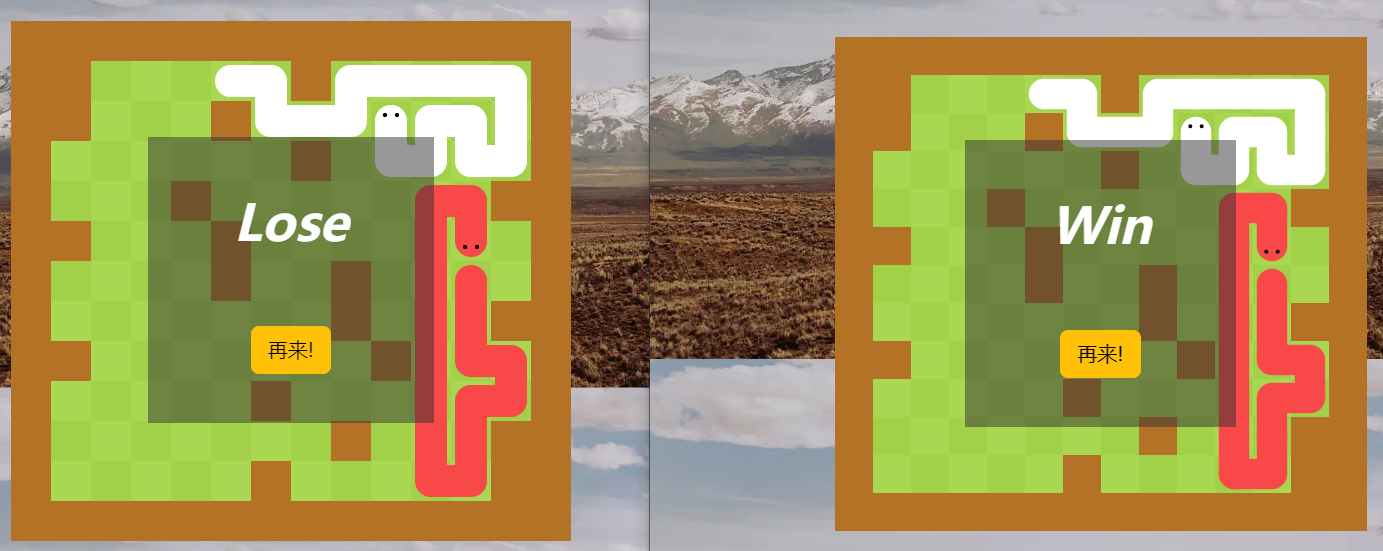
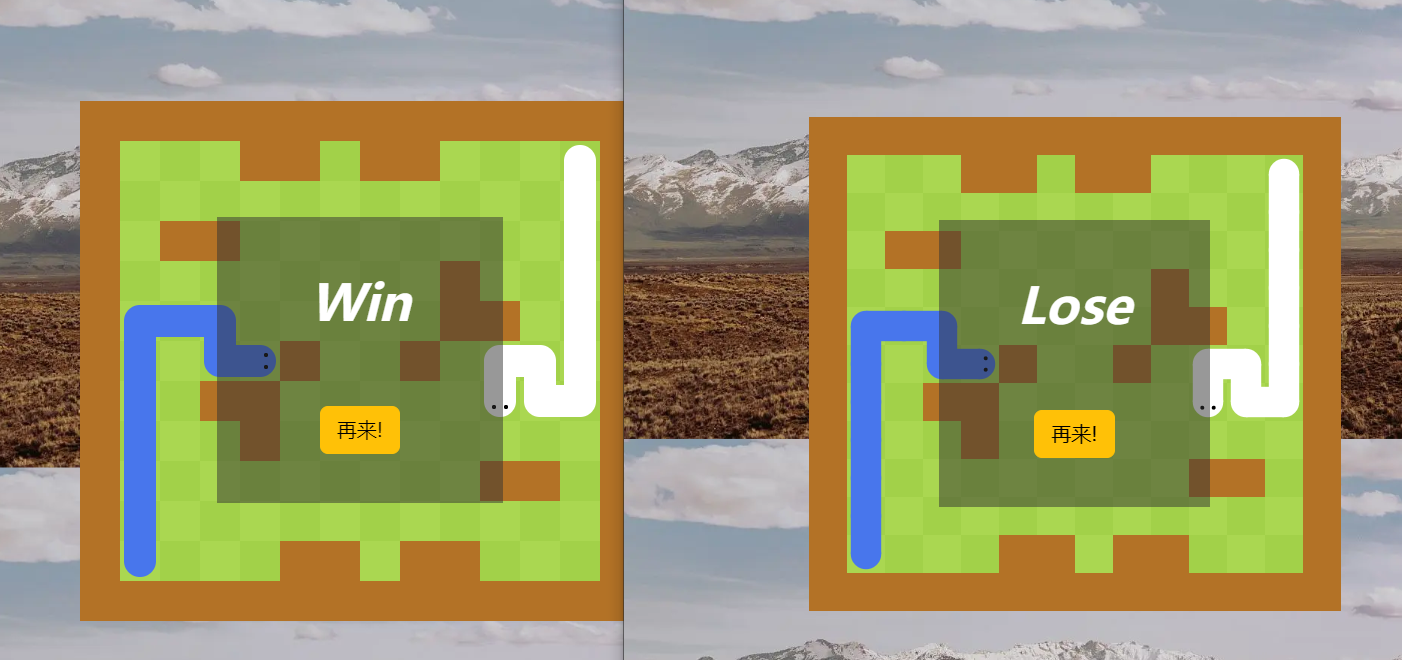
对战结果如下:
结果1:
结果2:
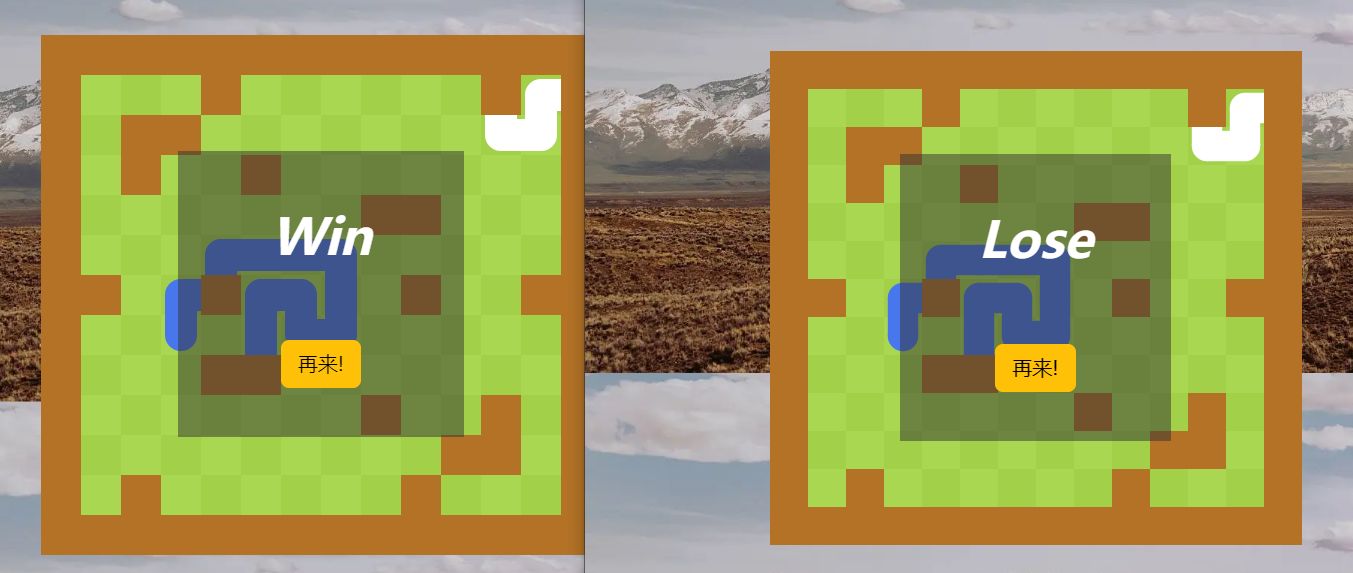
可以看到,结果1中右边的蛇莫名其妙失败了。结果2中的蛇竟然可以穿过障碍物。因此此时的程序是有问题的。
程序优化
出错原因
经过半天的检查,终于发现,在进入对战页面前,Bot代码已经进行了多个输入了。因此我们看到的第一个输入有可能时Bot代码执行的第n个输入了。
这里的原因是因为,在前端匹配成功2s后才进入对战页面,而后端匹配成功后则会立即获取下一步,之前因为存在玩家自己输入,所以不会有任何问题,但是Bot代码执行不会有延时,在前端等待的2s内,已经有了多次输入了。
前端代码:
1
2
3
4
5
6
7
8
9
10
11
12
| <script>
if(data.event === "success-matching") { // 表示匹配成功
store.commit("updateOpponent", {
username: data.opponent_username,
photo: data.opponent_photo,
});
setTimeout(() => {
store.commit("updateStatus", "playing");
}, 2000);
store.commit("updateGame", data.game);
}
</script>
|
改进办法
因此我们需要在后端匹配成功获取下一步操作之前将也睡上2s,即可进行同步。
修改backend/consumer/utils/Game中的run函数,加上Thread.sleep(2000);
1
2
3
4
5
6
7
8
9
10
11
12
13
14
15
16
17
18
19
20
21
22
23
24
25
26
27
28
29
30
31
32
33
34
35
36
| @Override
public void run() {
try {
Thread.sleep(2000);
} catch (InterruptedException e) {
throw new RuntimeException(e);
}
for (int i = 0; i < 1000; i++) {
if (nextStep()) {
judge();
if ("playing".equals(status)) {
sendMove();
} else {
sendResult();
break;
}
} else {
status = "finished";
lock.lock();
try {
if (nextStepA == null && nextStepB == null)
loser = "all";
else if (nextStepA == null)
loser = "A";
else
loser = "B";
} finally {
lock.unlock();
}
sendResult();
break;
}
}
}
|
运行效果
可以看到,当两个Bot都没有路走的时候才会失败。
